
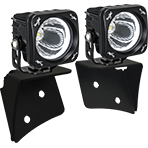


Optimus Round Installation Instructions
FEATURES
1. Single 10-watt LED Produces 883’ of Usable Light
2. Integrated Electronic Thermal Management (ETM)
3. PWM Integrated Dimming Circuitry
XIL-OPR110KIT SERIES SPECIFICATIONS
1. Warranty : Extended
2. Amp Draw : 1.67A (12V)
3. Input Voltage : 9-32V
4. Beam Patterns : 10°, 20°, 60°
5. LED Lifespan : 50,000 Hours
PREPARATION
1. We recommend completely reading instructions before installing.
2. Consult your local state regulatory agency regarding the use of LED
lighting.
3. The placement of LED lighting should not restrict airfl ow to the radiator,
or block head lamps, turn signals, or parking lights.
MAINTENANCE
1. All Vision X models have been designed for maintenance free use. In the
case an LED lamp or other part replacement is needed please contact
your authorized service center.
WARNING: Bolts, Nuts, and Washers are Stainless Steel. DO NOT USE
Pneumatic or Electric Tools to Tighten and Loosen. The Hardware Will
Permanently Lock Together.
MOUNTING INSTALLATION
1. Determine where the light/lights will be placed.
2. Hold mounting bracket with light to desired mounting surface. Using a
marker or pick tool, mark the bolt hole on the desired mounting surface.
3. Set the light aside. Find the center point of the hole you have marked out
and drill out a large enough hole to fi t the 5mm bolt [Part M1].
4. Remove the Mounting Bracket from Light by unscrewing the (2) 5mm Allen
Head Bolts [Part M4], one on each side.
5. Set Bracket down on Desired Mounting Surface, Lining up the Hole in the
center of Mounting Bracket with the Hole you just Drilled, Slide 5mm Bolt
[Part M1] through both.
6. On the other side of Mounting Surface slide 5mm Washer [Part M2] and
5mm Nylock Nut [Part M3] onto 5mm Bolt. [Part M1] Tighten Nut [Part M3]
& Bolt [Part M1] to Desired Tightness.
7. Hold Light in Mounting Bracket while screwing in the (2) 5mm Allen Head
Bolts [Part M4], one on each side. Use 5mm Allen Key [Part M5] to tighten
both 5mm Allen Head Bolts [Part M4] to Desired Tightness.
LIGHT ANGLE ADJUSTMENT
1. Use the 5mm Allen Key [Part M5] to loosen each of the Allen Head Bolts
[Part M4] on either side of the light.
2. Adjust the light until you have your desired angle.
3. Then, tighten the Allen Head bolts [Part M4] to hold the desired position.