
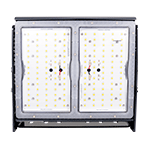


LED Light Installing and Using This Product
Note: Read instructions completely before installation or use of this product. Professional installation is recommended.
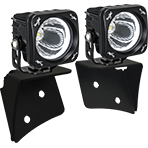
Mounting –
Mount light bar in desired location, keep bottom base nuts snug but don’t tighten. Adjust bar so it is centered on off road machine. Tighten bolt on the bottom of the bracket to 20 ft/lbs.
Wiring Using Included Harness –
While your light is multi-volt capable, the included relay harness has a 12V only relay.
Mount switch provided in harness (if you have your own switch it’s OK to use), connecting fused red wire to positive power source (battery terminal OK), now carefully route the harness from the mounted switch to the battery and then to the LED light. Connect the 2 black ground wires with ring terminals to chassis ground or negative (-) battery terminal. Connect the fused red wire off relay to positive (+) battery terminal. With all connections made, connect the weatherproof connector on the harness to the light. Test the light at this time.
Adjust light –
Adjust the light to the desired horizontal height, then use the supplied Allen wrench to tighten both side Allen bolts on each end. A good reference point is at 20 ft; the top of the beam should be 3” down from center of light (with the light bar at dead center). Tighten light and enjoy.
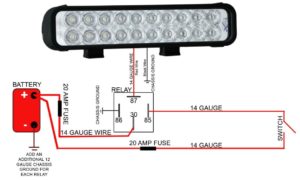
Custom Wiring (optional) –
All electronics are internal so there is no need to mount external electronics. Each light has a simple 2 wire hook up. Red being + 12v and black being – 12v. Lights should be wired to a switch through a relay with a maximum of 2 lights per relay, up to 12” bars, and 1 light per relay for larger, for optimum durability and performance. Each relay should be wired as follows:
86 – chassis ground
85 – 12v + trigger from switch
30 – 14 gauge 12+ from battery (minimum gauge is 14 for 2 lights)
Duplicate relay packs can be wired for additional lights. Switch trigger can be jumped from relay to relay.
Remaining black wire on light should be chassis grounded or grounded to the negative terminal of the battery; making sure grounding surface is cleaned down to metal, using a stainless steel bolt to secure grounding ring.
Warning –
Make sure all wiring is away from hot surfaces and moving parts.
After installing lights be sure to position lamps so they do not blind other drivers. Position your vehicle approximately 20 feet from a wall. The top of the beam projected on the wall should be 3 inches lower than the lights center.
Do not place lights near anything flammable after being used.
Some vehicles create high voltage upon starting or shut down, do not have lights on when staring or turning off the vehicle.
Lighting laws and regulations vary by state. Check your local laws before using.
Let lights cool down before handling after use.
Do not look directly into lights; doing so can cause eye damage.
Lifetime Limited Warranty –
1. Proof of purchase is required to validate warranty and is valid from the original date of purchase. All products must be bought through a Vision X Authorized Dealer or one of their dealers/resellers.
2. Improper installation, accident, abuse, neglect and normal wear are not covered under warranty.
3. Lights operated in environments over 150o Fahrenheit are not covered under warranty.
4. Warranted items will be repaired to working condition and returned without cosmetic alterations.
5. All customer warranties should be handled through the dealer/reseller the product was purchased from.
6. If product is not under warranty, clients will have to cover shipping charges both ways.
7. Additionally, non-warranted items can be repaired at the customer’s expense of parts and labor, at the discretion of Vision X, who will provide an estimated repair cost before proceeding with the repair.
A Two light Relay Harness is Available from Vision X, Part # P-HARNESS.2XIL
For installation\technical information contact your Vision X Reseller.
View